Happy Halloween! {and a nerdy pumpkin carving affair}

0 comments

Jordyn and I hosted a pumpkin carving party on Saturday, and it was one giant nerdfest.  The resulting pumpkins were absolutely hilarious, and I'm so proud of us.  Haha.  The above two pumpkins are Loki (on the left) and Thor and his exploding hammer (on the right), and are Jordyn's and my pumpkins respectively.

It was a fun night complete with hot apple cider, popcorn, and apple cider donuts.  So good.


Please take note of my awesome photoshop job in the above photo.  So corny, but I love it.
(hint: I'm not really holding Thor's hammer!)


Happy Halloween!

p.s. ♥ kelsey 

outfit post: too much TARDIS?

0 comments

This is one of the geekiest outfits I've ever worn.....and I'm proud of it.

Some might say it's too much TARDIS, but I say there's no such thing!  I'm a sucker for geeky t-shirts, and this one even glows in the dark.  Be jealous.  Jordyn's boyfriend Bobby gave it to me for my birthday....so mega points go to him!

 t-shirt: toy traders // jeans: aeo // shoes: diy (originally from urban outfitters)


Happy Halloween Eve!

p.s. ♥ kelsey 

tasty tuesday: pumpkin scones with caramel drizzle

0 comments

Oh scones.  You are so beautiful....to me!

Seriously, they are so good.  Jordyn found a super solid scone recipe years ago, and has slowly tweaked it into perfection.  It's always her base whenever she experiments with new flavors, and this time was no different.  Her and I discussed ingredients and chemistry....and finally decided that we were just going to substitute pumpkin for sour cream, and cross our fingers that it would work.

Let' just say....it worked.  Magnificently.


Of course we added in a bit of cinnamon too, because cinnamon and pumpkin kind of belong together.  They're basically soul mates.

Oh yeah, did I mention that we then drizzled caramel all over them?  Because we totally did that.  Are you really surprised that there was caramel involved?  Nope, didn't think so.


Pumpkin Scones
by: Jordyn & Kelsey

Ingredients:
Scones
1 cup pumpkin
1 tsp baking soda
4 cups all-purpose flour
1 cup white sugar
2 tsp baking powder
1/4 tsp cream of tartar
1 tsp salt
1 cup butter, chilled (and cubed)
1 egg

Directions:
1)  Preheat oven to 350 F.
2)  In a medium sized bowl mix together pumpkin, baking soda and the egg.   Let this mixture sit while you combine dry ingredients separately.
3)  In a large bowl mix together the flour, white sugar, baking powder, cream of tartar and salt.
4)  With a pastry blender cut in the chilled butter.  If you do not have a pastry blender, cut it into pieces with a knife before you add it, and then blend it with a fork.
5)  Now stir in the wet ingredients, careful not to over mix.  I usually end up with a mixture that resembles large crumbs and is a bit floury - rather than dough.
6)  Don't worry if it is a bit of a mess, dump it onto a lightly floured surface, and gently press it together until it sticks together.  (think biscuits or pie dough - you are NOT kneading bread!)
7)  Once it sticks together in a decent ball, cut it into 4 sections.
8)  Gently flatten out each section into a circle, and cut into 6 triangles.
9)  Transfer these triangles onto a baking sheet, and bake for 12-15 minutes at 350 degrees, or until golden brown on the bottom.

While the scones are baking, make your caramel (we stuck ours in the fridge to help it cool down a bit quicker.
Remove the scones from the pan while they're still hot, and spoon the glaze over top (see below for recipe).  It should run nicely down the sides, and then harden a bit.

We chose to make our own caramel, and then added a bit of icing sugar to make it a glaze.

Homemade Caramel
1/2 cup Sugar
3 TBSP Butter (we used salted butter!)
1/4 cup Whipping Cream

1)  The most important thing to do first is to assemble all of your ingredients!  Once your sugar mixture has reached the right colour, you'll need to move fairly quickly, and don't want to be fussing around with measuring out the other ingredients.
2)  Place your sugar in a medium saucepan, and melt at a medium heat.  Once it begins to melt, you'll want to start whisking it. (You can also add a tad of water if you don't feel comfortable melting dry sugar!).
3)  Once the sugar starts to boil, you can stop whisking, and wait for it to turn a light amber colour.
4)  When it's light amber, then add your butter, and stir like crazy!
5)  As soon as the butter has completely melted, remove from heat and add the whipping cream.  Again, stir like crazy! (Be cautious when adding the cream as it will foam a lot!)
6)  Let the caramel cool for a bit, and then you can move it to a heat proof container and pop it in the fridge to help hurry up the cooling process.
7)  To make it into a glaze, slowly add a bit of icing sugar until the caramel is a bit thicker.  How much icing sugar you add depends on how thick you want your glaze! 

Now dig in!


These scones make the perfect addition to all of the wonderfully foggy Fall mornings we've been having out here on the West Coast!  Well, let's be real here.  They make the perfect addition to basically any morning, anywhere.

p.s. ♥ kelsey & jordyn


“Swamp Monster” by Basil Wolverton from Weird Mysteries #5 1953

0 comments
Basil Wolverton Swamp Monster Weird Mysteries 5 04_cr
“Swamp Monster” by Basil Wolverton
from Weird Mysteries #5 1953
Basil Wolverton Swamp Monster Weird Mysteries 5 01Basil Wolverton Swamp Monster Weird Mysteries 5 02Basil Wolverton Swamp Monster Weird Mysteries 5 03Basil Wolverton Swamp Monster Weird Mysteries 5 04Basil Wolverton Swamp Monster Weird Mysteries 5 05Basil Wolverton Swamp Monster Weird Mysteries 5 06
more Basil Wolverton HERE:

diy: TARDIS painted pumpkin

0 comments

I really really love Doctor Who.

If you didn't know that before, I'm sure it's blatantly obvious now.
(Remember the TARDIS shoe diy?  More proof.)


This pumpkin actually has a funny story behind it.  I found it while we were harvesting pumpkins about 6 weeks ago, and I thought to myself: "What a strange looking pumpkin.  It's almost shaped like a rectangle!".  I instantly knew that it had to be mine, and that I was going to paint it like a TARDIS.  So here we are!  I painted it like a TARDIS, and am quite pleased with it.

Materials:
-blue paint
-black paint
-white paint
-paintbrushes (one large, one small)
-white paint pen
-a lot of patience

Directions:
First I washed and dried my pumpkin to ensure no dirt remained.  Then I painted 2 coats of blue paint over the whole thing, letting each coat completely dry before applying the next.  Next, I used a small paintbrush to paint fine black lines along the "corner edges" of the TARDIS, and let it dry.  I used a pencil to then outline the black rectangle at the top of each side (where "Police Public Call Box" will go), as well as the 8 panels on each side. I painted the black boxes in, as well as mixed a dark blue colour to outline each panel.  After everything was dry, I wrote out Police Public Call Box using pencil first, and then used a white paint pen to write over top of it.  I printed out the little sign for the front door, and stuck it on with double sided tape!  
{*Update: I fixed the missing windows :P  so now it looks much better}

Let it dry, and you're good to go!


Happy pumpkin painting!

p.s. ♥ kelsey

outfit post: stripes and mustard

0 comments

I absolutely can't believe that October is almost over!  Seriously?  Where did it go?

I'm so sad that our apple harvest is nearly over, and almost all of our pumpkins have been sold.  I'm so so sad that I didn't get to take advantage of the gorgeous backdrop the farm provides this Fall for more photoshoots...but I've just been too darn busy working!  Therefore, today after work I raced into the house to get cleaned up a bit so that I could head back out into the field to take some photos.  Jordyn and I were even treated to the most magnificent sunset while we were out there.  So lovely.


Also, it was ridiculously windy while we took these photos.  It was crazy, and so beautiful as it rained down coloured leaves around us.  Have I mentioned how much I love Fall yet?


cardigan: bootlegger // sweater: the gap // jeans: aeo // boots: steve madden // toque: foreverxxi // mittens: gift for my grade 7 b-day!


Also, we had an epic pumpkin carving contest last night.  It was the bomb.  Can't wait to share it with you all!

p.s. ♥ kelsey

[baked] apple cider donuts

0 comments

I've been seeing a lot of Fall bucket lists going around the interwebs these days, and sometimes they make me chuckle. I live on a pumpkin patch where I pick apples for my job, we make apple cider on a weekly basis, there are hayrides every day of the week, and picking corn is kind of like a boring version of a corn maze.  Sooo....I've definitely crossed off most things on these bucket lists without even trying!  It reminds me not to take things for granted, and every day I feel so blessed to live and work in such a cool place.

However, one of the things on my Fall baking bucket list was to make apple cider donuts!  I had never actually heard of such a thing until I came across a post on tumblr about them.  I was instantly intrigued, and thought they sounded like the epitome of a Fall dessert.  Warm, cozy, fluffy donuts with apple cider and cinnamon?  Perfection!  


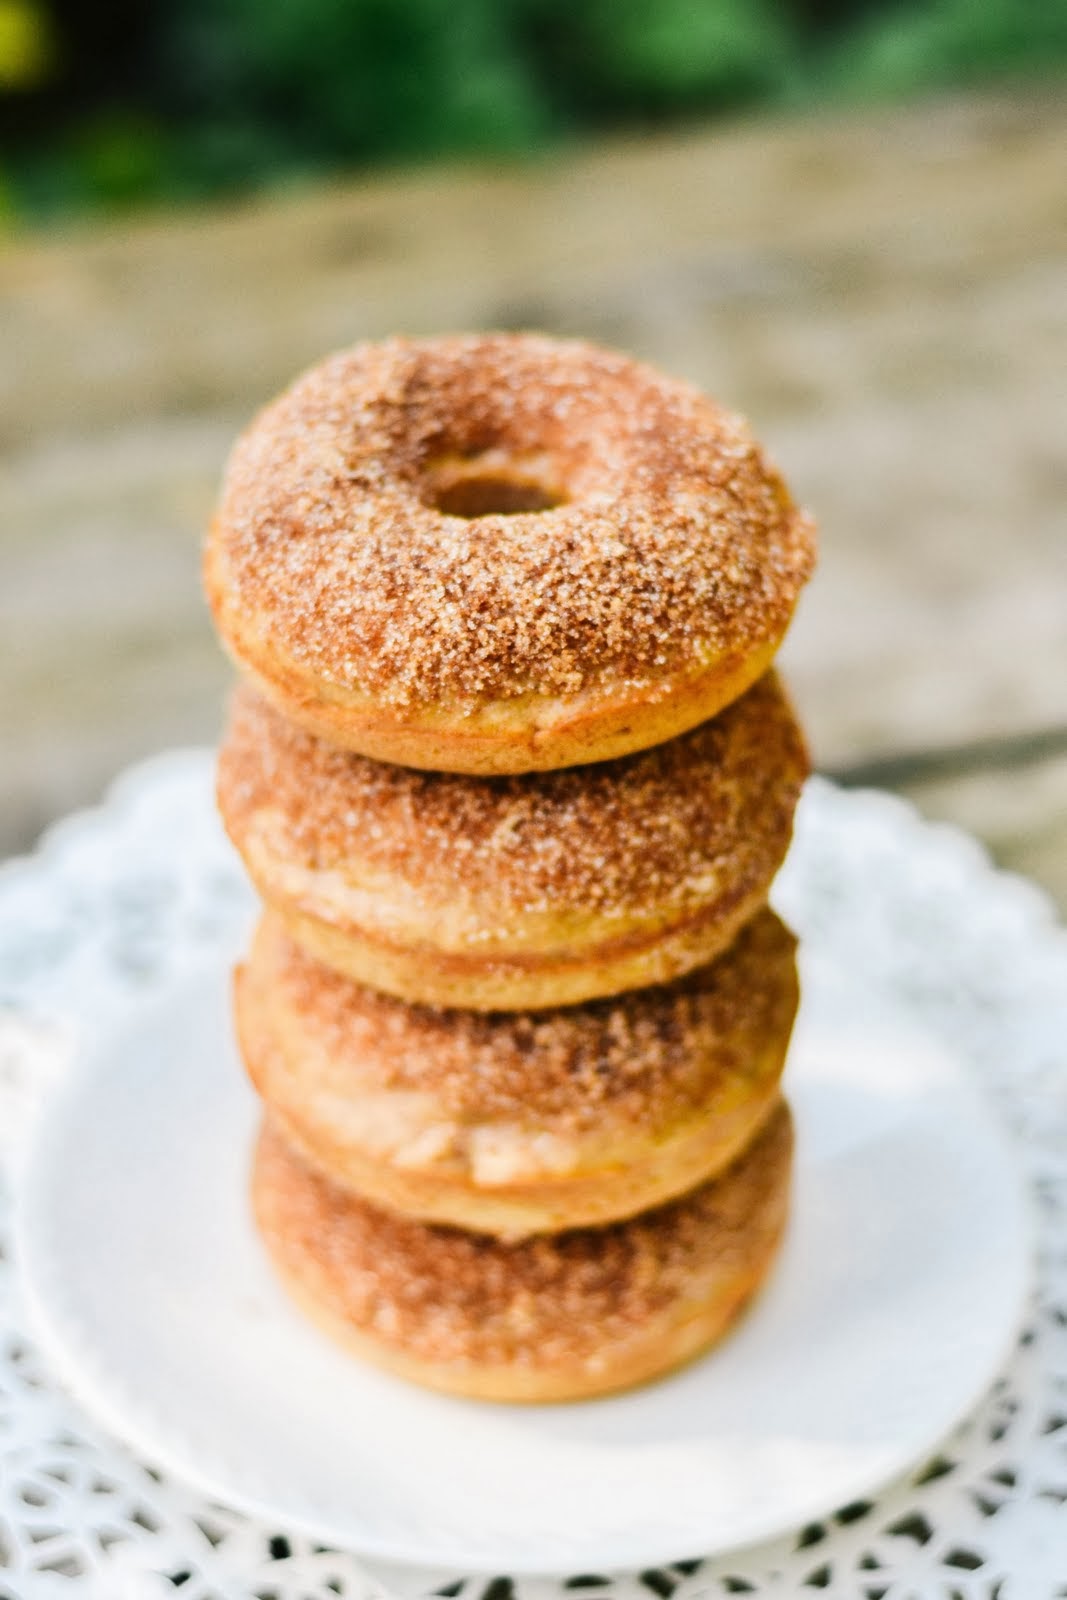
My expectations were cautiously high for these donuts, and I wasn't disappointed!  I also quite successfully convinced myself that because they were baked donuts (and not deep-fried), they must be healthy for you.  Am I right?

Apple Cider Baked Donuts
adapted from: eat, live, run
yields: 11-12 donuts

Ingredients:
2 cups all purpose flour
3/4 cup brown sugar
1 1/2 tsp baking powder
1/4 tsp baking soda
1 tsp salt
2 tsp cinnamon
2 eggs
2 tbsp unsalted butter, softened
1/2 cup apple cider
1/4 cup buttermilk  [or 1/4 cup of milk with 1/2 tsp of vinegar....let stand for 5-10 minutes before using]
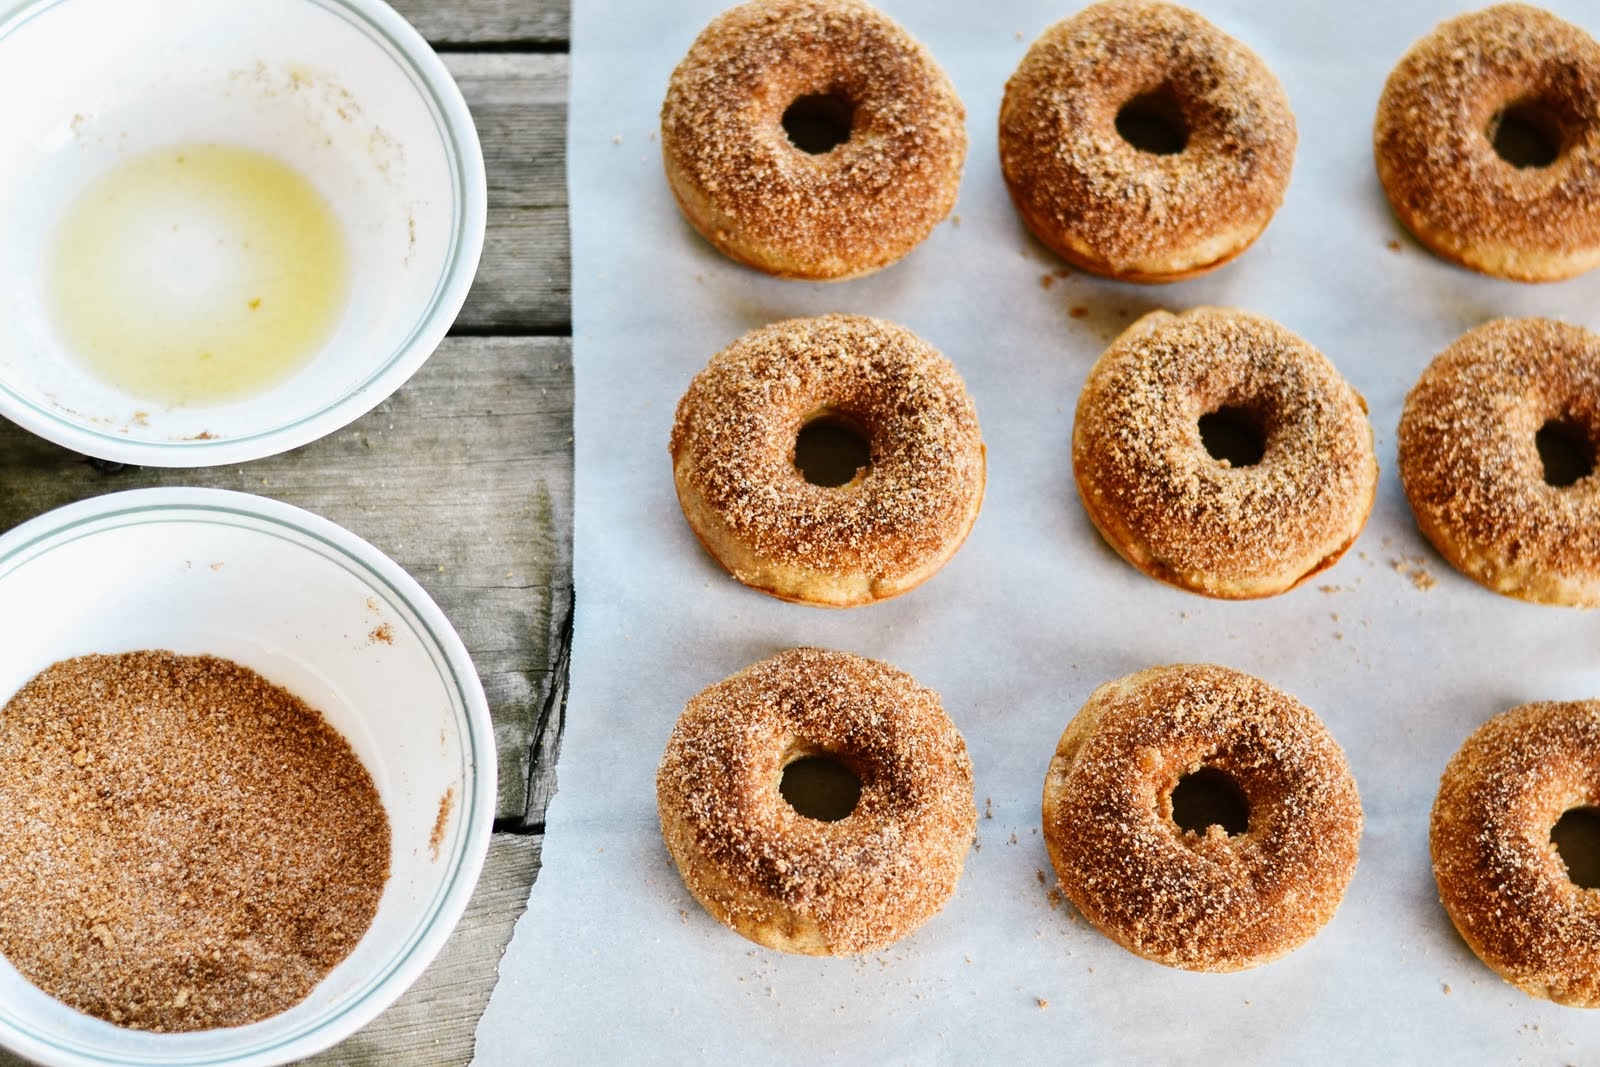
Topping:
2 tbsp butter, melted

1/4 cup brown sugar
1/4 cup white sugar
1 tbsp cinnamon (or to taste)

Directions:
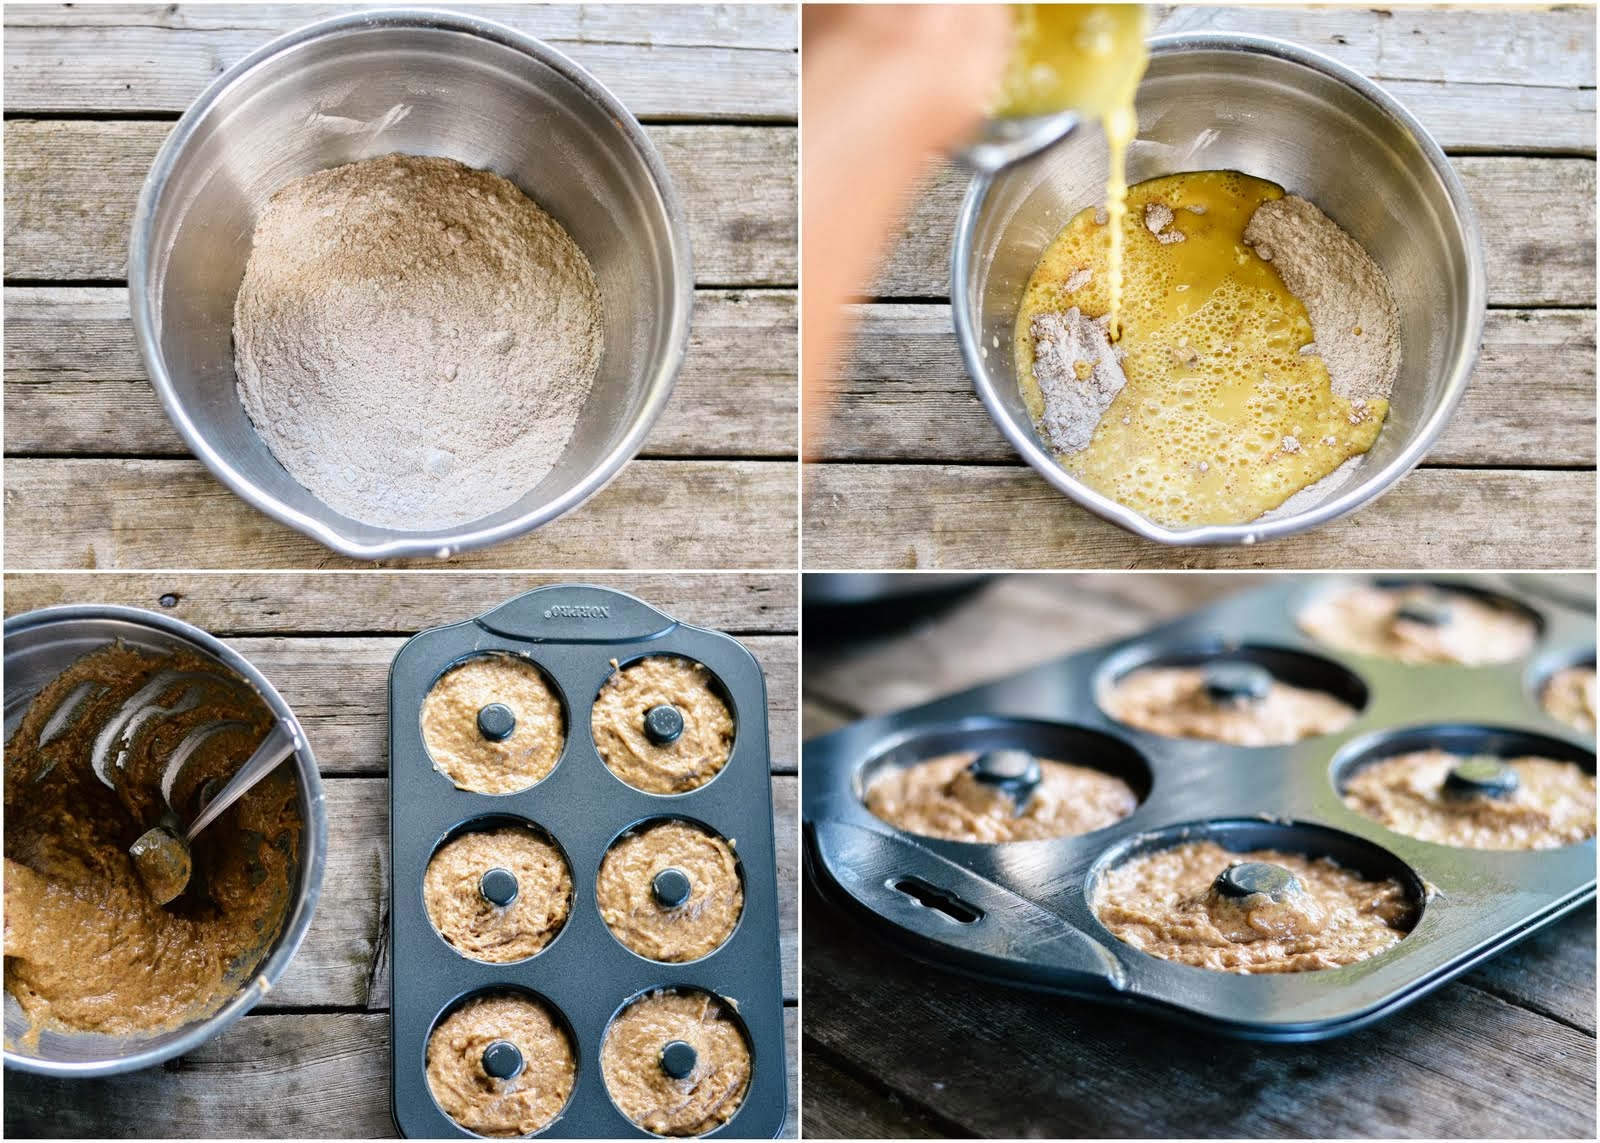
1)  In a large bowl, mix together the flour, sugar, baking soda, baking powder, salt and cinnamon.
2)  In a smaller bowl, mix together the softened butter with the eggs until fluffy (doing this ensures that your butter doesn't re-solidify once the cold buttermilk and cider are added).  Add buttermilk and apple cider, and mix well.
3)  Pour wet ingredients into the dry, and stir until just blended.  Try not to overmix!
4)  Spread the batter into a greased donut pan.  I used a large spoon to drop the batter in, or placing your batter into a pastry bag to pipe into the pan makes the process nice and easy.  Fill each mold about 3/4 full.
5)  Bake at 350 degrees for 8-10 minutes, or until an inserted toothpick comes out clean. You may want to break open a test donut just to make sure the inside isn't gummy!
6)  For the topping: melt the butter in a bowl that will fit a donut inside it.  Then, dip each donut quickly into the butter, and then into the cinnamon sugar mixture.

*These are best on the first day, as they tend to get a bit soggy once you place them in a container.


Do you have your own version of a Fall bucket list?  I'd love to hear what's on them! 

p.s. ♥ kelsey