
Showing posts with label Vintage. Show all posts
Showing posts with label Vintage. Show all posts
“Tack’s Cartoon Tips for the Aspiring Cartoonist” (1923) Vintage Book on How to Draw Cartoons
0 comments
Brand-new high-res scans from “Tack’s Cartoon Tips for the Aspiring Cartoonist” (1923) — I’ll be posting the whole book on my “How to Draw Cartoons” page at https://www.facebook.com/CartoonTips
outfit post: vintage floral skirt
0 comments
Jordyn found this gem of a skirt in a vintage thrift shop in downtown Abby, and I'm kind of insanely jealous of it. It's high-waisted, floral, and overall just lovely. Let's just say that I'll probably be attempting to "steal" it from her in the near future.
I also would like to think that I had a bit of influence in the styling of this skirt...since Jordyn decided to pair it with a delicate lace top, and a simple grey cardigan. Definitely something I would do. I think my style suggestions are slowly being absorbed by her brain! Resistance is futile.
I also would like to think that I had a bit of influence in the styling of this skirt...since Jordyn decided to pair it with a delicate lace top, and a simple grey cardigan. Definitely something I would do. I think my style suggestions are slowly being absorbed by her brain! Resistance is futile.

skirt: champion jack's // lace top: the garage //cardigan: winners // shoes: sterling


p.s. ♥ kelsey (& jordyn)
{ all you need is love }
0 commentsHappy Valentines Day dear readers!
I am absolutely thrilled to present you with a Valentines Day tea party inspiration shoot that I organized and did the photography for here in Edmonton. Here's a little taste of what I've been up to.... For more love, please go visit my photography blog @ claracphotography.blogspot.ca and leave me some love too!
Wishing you all an absolutely lovely day~


p.s. ♥ clara
diy: glass bottle necklaces
0 comments
I've been obsessed with making my own glass bottle necklaces for MONTHS ever since I saw one in a sweet local shop near my apartment in Vancouver. The price was a little too steep for me, so I had to walk away, but it sparked an idea that I should make my own!

These were ridiculously easy, and so much fun to make!
Supplies:
-small glass bottles/vials
-eye hooks
-necklace chain
-jump rings (optional)
*assorted things to put inside: glitter, beads, feathers, tiny messages, etc.


I got these little bottles from Michaels....and they came in a pack of 9 assorted shapes and sizes. I know that you can also get these pretty cheap off of ebay as well!

First you'll want to screw an eye hook into the middle of the cork stopper.
Then, fill up your bottle with whatever your heart desires. I chose glitter, sand, a feather, and a message in a bottle.
Finally, add a dab of glue (E-6000 craft glue works great) on your cork, and twist gently to seal your bottle shut. This way your necklace won't come apart!


I have a secret love for glitter. It just makes me irrationally happy! The only problem is that it gets absolutely everywhere, and will keep popping up on your face/hands/hair for days after you use it. But the little girl in me just doesn't care....and I love having an excuse to use it!

For the message in a bottle, I first wrote a short note on a skinny piece of paper.....

Then, I rolled it up, glued it shut, and drew a tiny "seal" on it to finish it off!


Then I used a jump ring to attach the bottle to the necklace chain. Now this step is optional, as long as your chain will fit through the eye hook. However, the nice thing about a jump ring is that it ensures that your bottle won't slide around/off of the chain as it keeps it exactly in the middle of the chain at all times!


I love the whimsical look that the feather adds, and I have also seen dandelion seeds used in similar diys!

I hope you've enjoyed this simple diy. Let me know if you decide to give it a shot!
p.s. kelsey ♥
p.s. kelsey ♥
sister style: a lace affair
0 comments
I (being Clara) became friends with Kelsey during my first year at University of British Columbia while living at Menno Simons Centre, a Christian community house a little ways off campus. When I first met "the little sister" (aka Jordyn) on a visit to Kelsey's farm in Abbotsford, I was struck immediately by the differences in these two girls.
Kelsey is the classic brown-eyed, honey golden haired beauty who is soft-spoken, gentle and just simply lovely... & Jordyn is her polar opposite. White blonde hair with bright baby blue eyes, this girl is full to brim with energy and spunk!
These two have definitely earned their names as: the romantic baker & the quirky videographer.
However, I quickly learned that despite their differences, these girls are thick as thieves and compliment each other so well, bringing out the best in each other. Truly, these two are a perfect sister match =)


Aren't they the cutest in their matching lace dresses from Urban Outfitters? I seriously just love these two soooo much! They have such a beautiful friendship / "sister-ship" and they have so much fun together...makes me wish I had a sister of my own! Good thing I've been adopted as the "asian sister"! - teehee-


aaaand of course we had to throw in this one cause it shows the blogging world what Kelsey looks like with her classic scrunched up, "I'm so very displeased with you but don't know how to actually look angry" face & Jordyn in the background looking as exuberant as ever cause...well, she's just Jordyn! ;)


Doing what they're best at...Kelsey with her vintage camera & Jordyn with her vintage video camera.

p.s. clara , kelsey & jordyn ♥
diy : revamped vintage suitcase
0 comments
Today's diy is pretty dear to me and my husband because we inherited this darling little suitcase from Caleb's grandpa, who just recently passed away. The floral print was another thing that we picked up from grandpa's apartment, so we have a little bit of grandma's touch in there too. (She passed when Caleb was a little boy.) So I dearly hope you enjoy this diy, because it's a pretty special one that's being passed down the family line of the Hildebrands!
& Here's the inspiration for today's post... straight from one of my most favourite blogs =)
Supplies : vintage suitcase, linens, scissors, pencil, glue stick, mod podge & a palette knife.

- I N S T R U C T I O N S -
1. Spread your print out on the suitcase and outline the edges of the suitcase.
2. Cut along the penciled outline, leaving a couple centimeters of room to tuck into the suitcase seam.
2.5 (shown below the instructions but not crucial to this project...) If you're totally happy with your choice in fabric, take a glue stick and go nuts on the face of your suitcase for additional "support"! I also ironed my fabric before tucking everything in and gluing it down.
3. Using your palette knife (or any other flat edge), tuck in the edges.
4. Lastly, using a small paintbrush, paint on mod podge along the seam to seal it.

Here it is before...

And after! I was so ecstatic that this project worked out so well!


Here's the inside of it... I'm not sure if I want to leave it or try and revamp it as well...I kind of like the mustard yellow...Any suggestions?
 And here it is with a couple other things we picked up from grandpa's apartment, including a vintage book that has grandma's writing all over it, a crocheted table cover, and a collection of old vintage matchbooks from all over the Prairies!
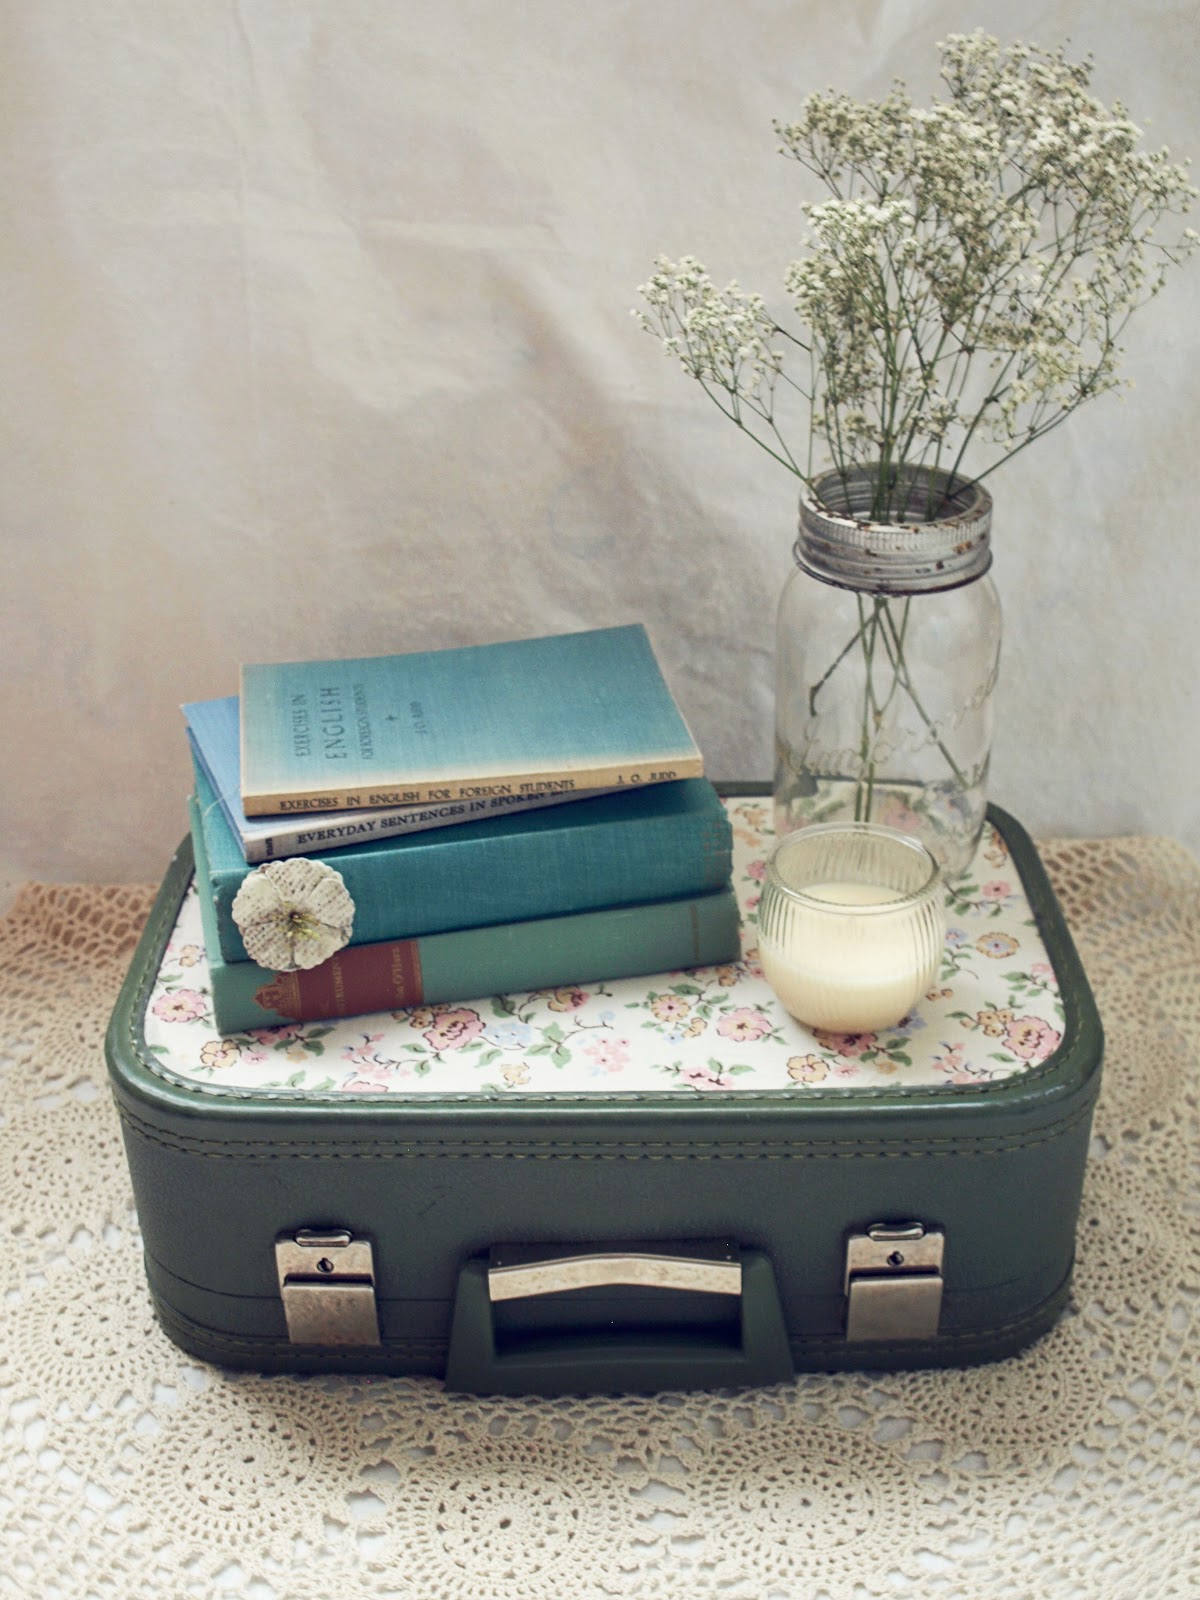
I loved how this turned out and I think it'll quickly become a staple prop in my photoshoots :)
Hope you enjoyed this as much as I did!
p.s. clara ♥
Subscribe to:
Comments (Atom)