Showing posts with label treats. Show all posts

mocha cheesecake

0 comments

I could have titled this post: "the only cheesecake I ever make", because that is the truth.  
I've tried several other recipes for cheesecakes, but this one is my all-time favorite.  Since cheesecake is a relatively expensive dessert that I tend to only make once in a while (for special occasions!), I really don't like experimenting too much.  I just love this recipe too much!


Also, for those of you who aren't really coffee fans...fear not!  I'm totally not a coffee drinker (at all), and I can't get enough of this cake.  If you're still not sure, you can always leave out the instant coffee for an excellent chocolate cheesecake!

Mocha Cheesecake
from: Jean Pare - Company's Coming: Chocolate Everything

Ingredients:
1/3 cup margarine, melted
1 1/3 cups graham cracker crumbs
1/3 cup sugar
3 tbsp cocoa powder

3 oz semisweet chocolate chips
3 packages cream cheese (8 ounces each), softened to room temperature
1/2 cup sugar
1/2 cup brown sugar
2 tbsp flour
2 tsp vanilla
3 large eggs, at room temperature

1/4 cup milk
1 tbsp instant coffee granules

*whipped cream for topping (optional)

Directions:
Crust:
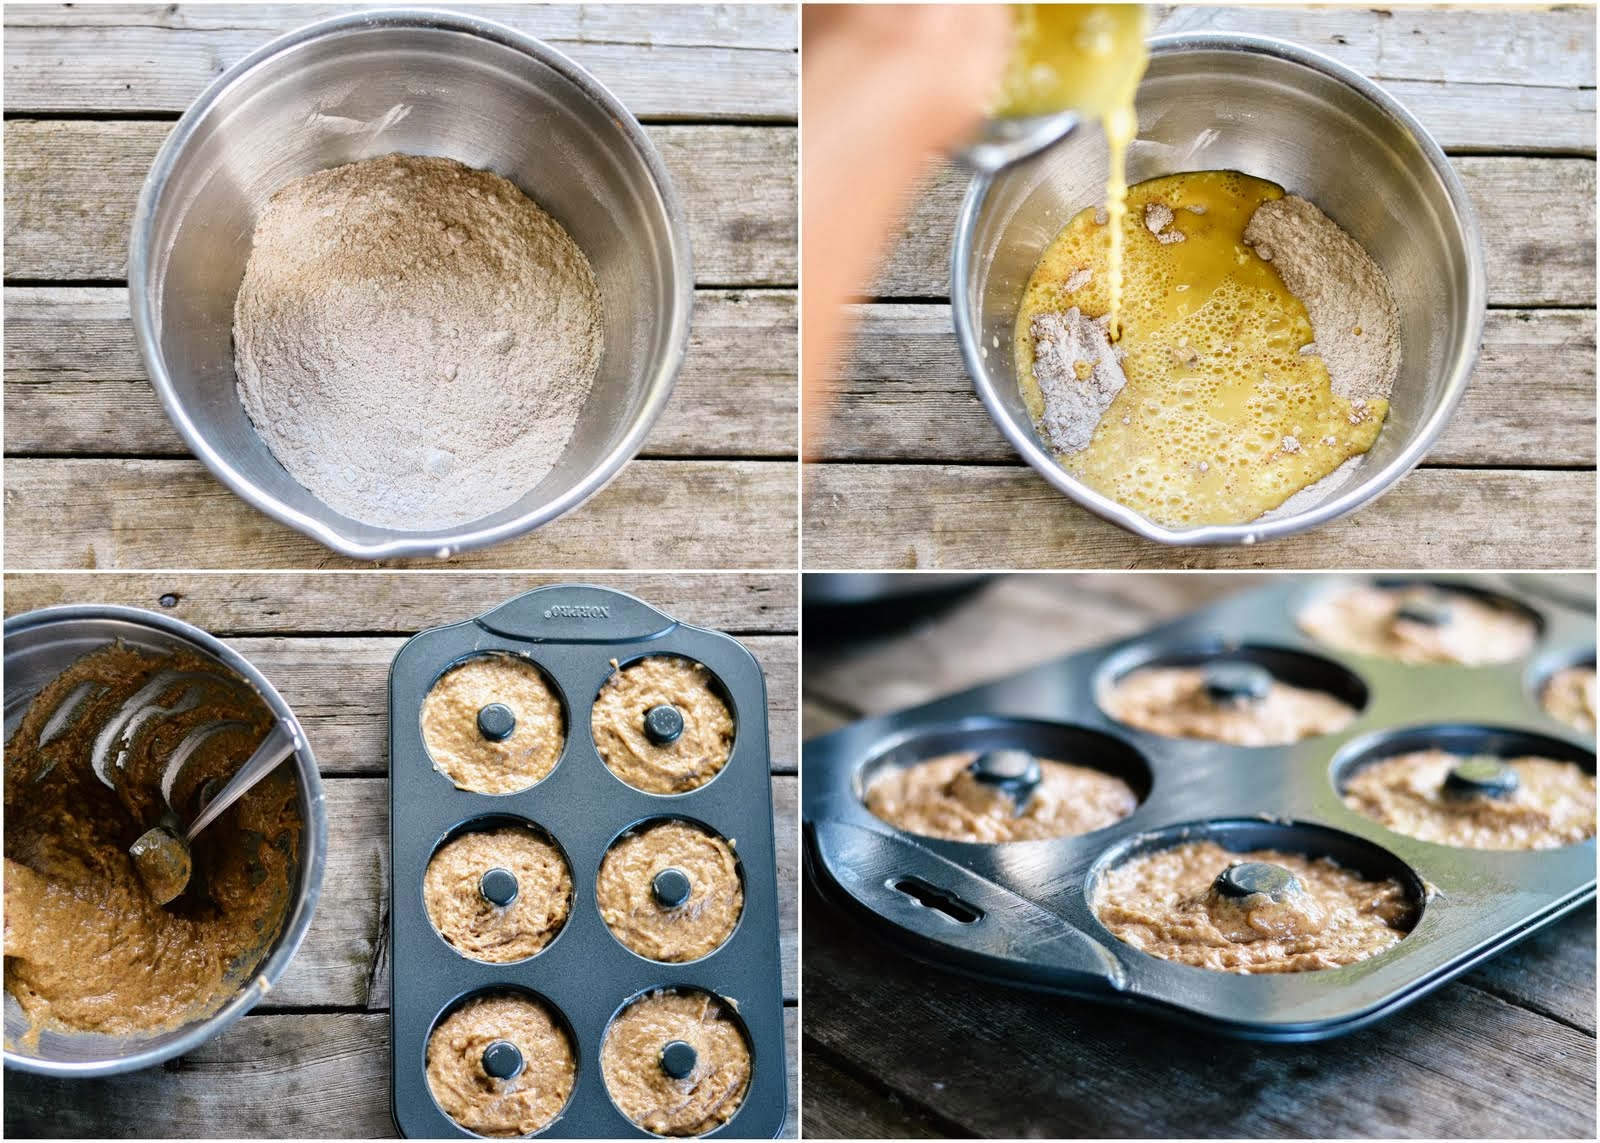
1)  In a small bowl, stir together margarine, crumbs, sugar and cocoa.
2)  Press into an ungreased 9-inch springform pan; set aside.

Cake:
1)  Melt chocolate using a double boiler (or in the microwave if you're very careful not to burn it!).  Set aside and let cool to room temperature once melted.
2)  Beat cream cheese, both sugars, flour and vanilla in a medium bowl.  Add in melted chocolate and beat until well mixed.
3)  Add eggs, one at a time, until just mixed.
4)  Stir together milk and instant coffee until granules are completely dissolved.  Add to the batter, mixing until just combined.
5)  Pour over crust.
6)  Bake at 300 degrees for about 1 1/2 hours until the center is almost set.
7)  When you've removed the cake from the oven, run a knife around the edges to help the cake settle without cracking.
8)  Chill for 8 hours or overnight.

Optional:
Chocolate Magic Shell Sauce:
Melt together 1/2 cup of chocolate (doesn't matter what kind!), and add 1 tbsp of coconut oil.  Stir together.
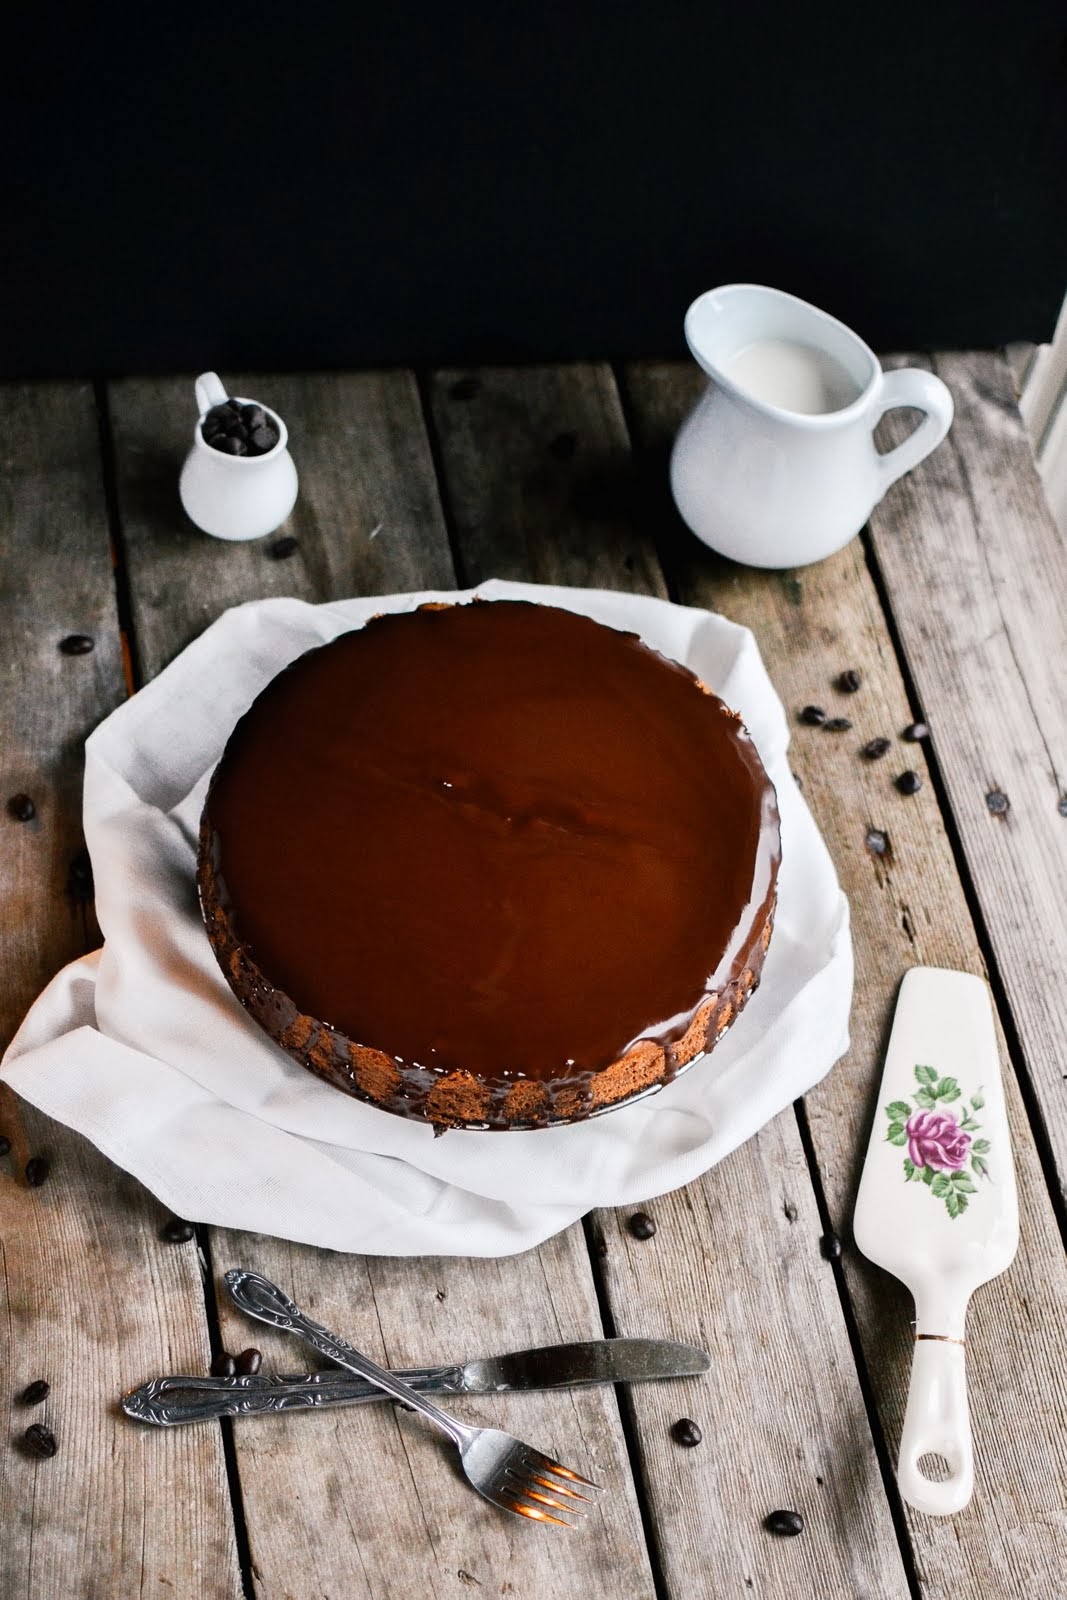
Pour over chilled cheesecake like you would a ganache, and the chocolate will form a shell!

*Our cheesecake was a teensy bit warm when we poured our magic shell over top, so that's why it looks a bit glossy still.  But if you've chilled your cake properly, or if you pop it back in the fridge once you've poured the chocolate over, then it will form a shell of chocolate that is so pretty!


This cake is long gone, but editing these photos were seriously making me drool.
#foodphotographerproblems

p.s. ♥ kelsey

tasty tuesday: bison cookies (chocolate sugar cookies)

0 comments


I am ridiculously excited to share these cookies with you all.  They are bison!!!  And they're hilarious.  Totally a man cookie.  So make these for your man friends and I guarantee they'll be pretty stoked (mine definitely were).

I made these bad boys as a snack for my mini Grey Cup party (that's like the Superbowl for Canadian football in case you're confused) I hosted a million years ago in November right before Christmas took over the blog.  Ha!  One of my friends has a dream to own a bison ranch when he "grows up", so I knew these would be perfect to make!


Jordyn and I debated doing gingerbread for the cookie base, but eventually decided that we wanted something a little simpler.  I decided that chocolate shortbread might be the way to go, however, recipe after recipe called for several hours of chilling the dough, and that just wasn't cool with my timeline.  So, we decided to just try something new!  Jordyn adapted our favorite sugar cookie recipe (see it here, here, and here!), and it turned out beautifully.

Chocolate Sugar Cookies
by: Jordyn Siemens

Ingredients
1/2 cup butter (room temperature)
3/4 cup sugar
2 tsp vanilla
1 egg
1 Tbsp milk
1 3/4 cups flour
1/4 cup cocoa powder
1 tsp baking powder

Directions
1) In a small bowl, cream butter - add sugar, vanilla, egg and milk; beat hard.
2) Add flour, cocoa powder and baking powder to cream mixture and beat again.
3) Roll onto a floured counter and cut into shapes.
4) Bake at 400 degrees F for 5-6 minutes.

Decorating
Icing (either soft butter cream or royal icing)
Chocolate sprinkles
Black icing (we bought a tube from Michaels)

1)  I used royal icing to outline where I wanted the bison's fur to be, leaving out the shape of the horn to fill in later.
2) Then I pressed chocolate sprinkles into the icing, and shook off any excess.
3)  Once the icing had set, I added in a small horn with white icing, as well as a black dot for eyes and black hooves.

*next time I'll use chocolate icing so that you can't see the white through the chocolate sprinkles.


I love how well these turned out, and am pretty stoked to have a new, no-fuss chocolate sugar cookie recipe.  It'll be great for more animal cookies that are sure to happen in the future!

p.s. ♥ kelsey

pumpkin squares with creamcheese icing

0 comments

This recipe is seriously fail-proof. It is soooo good, perfect for fall, and so simple!
They're always a hit and although they always satisfy my pumpkin cravings...
they definitely keep me coming for more :)


Ingredients:

3 eggs
1 cup brown sugar
1 cup oil
2 cans (15 ounces each) of pumpkin puree
2 cups flour
1 tsp baking soda
2 tsp baking powder
1 tsp salt
3 tsp cinnamon
pinch of nutmeg
pinch of cloves


Instructions:

Preheat oven to 350 degrees.
Mix first four ingredients in a medium sized bowl until light and fluffy.
Sift together the dry ingredients separately, then stir into wet mixture.
Spread batter into a 9x13 inch pan that is greased.
Bake for 30 minutes.
Cool before frosting!


Cream Cheese Frosting:

1 8 ounce package of cream cheese
1/2 cup of softened butter
1 tsp vanilla
3 cups of icing sugar


I promise, you won't regret making these! They're always a favourite and get gobbled up right away :)

p.s. ♥ clara

tasty tuesday: pumpkin scones with caramel drizzle

0 comments

Oh scones.  You are so beautiful....to me!

Seriously, they are so good.  Jordyn found a super solid scone recipe years ago, and has slowly tweaked it into perfection.  It's always her base whenever she experiments with new flavors, and this time was no different.  Her and I discussed ingredients and chemistry....and finally decided that we were just going to substitute pumpkin for sour cream, and cross our fingers that it would work.

Let' just say....it worked.  Magnificently.


Of course we added in a bit of cinnamon too, because cinnamon and pumpkin kind of belong together.  They're basically soul mates.

Oh yeah, did I mention that we then drizzled caramel all over them?  Because we totally did that.  Are you really surprised that there was caramel involved?  Nope, didn't think so.


Pumpkin Scones
by: Jordyn & Kelsey

Ingredients:
Scones
1 cup pumpkin
1 tsp baking soda
4 cups all-purpose flour
1 cup white sugar
2 tsp baking powder
1/4 tsp cream of tartar
1 tsp salt
1 cup butter, chilled (and cubed)
1 egg

Directions:
1)  Preheat oven to 350 F.
2)  In a medium sized bowl mix together pumpkin, baking soda and the egg.   Let this mixture sit while you combine dry ingredients separately.
3)  In a large bowl mix together the flour, white sugar, baking powder, cream of tartar and salt.
4)  With a pastry blender cut in the chilled butter.  If you do not have a pastry blender, cut it into pieces with a knife before you add it, and then blend it with a fork.
5)  Now stir in the wet ingredients, careful not to over mix.  I usually end up with a mixture that resembles large crumbs and is a bit floury - rather than dough.
6)  Don't worry if it is a bit of a mess, dump it onto a lightly floured surface, and gently press it together until it sticks together.  (think biscuits or pie dough - you are NOT kneading bread!)
7)  Once it sticks together in a decent ball, cut it into 4 sections.
8)  Gently flatten out each section into a circle, and cut into 6 triangles.
9)  Transfer these triangles onto a baking sheet, and bake for 12-15 minutes at 350 degrees, or until golden brown on the bottom.

While the scones are baking, make your caramel (we stuck ours in the fridge to help it cool down a bit quicker.
Remove the scones from the pan while they're still hot, and spoon the glaze over top (see below for recipe).  It should run nicely down the sides, and then harden a bit.

We chose to make our own caramel, and then added a bit of icing sugar to make it a glaze.

Homemade Caramel
1/2 cup Sugar
3 TBSP Butter (we used salted butter!)
1/4 cup Whipping Cream

1)  The most important thing to do first is to assemble all of your ingredients!  Once your sugar mixture has reached the right colour, you'll need to move fairly quickly, and don't want to be fussing around with measuring out the other ingredients.
2)  Place your sugar in a medium saucepan, and melt at a medium heat.  Once it begins to melt, you'll want to start whisking it. (You can also add a tad of water if you don't feel comfortable melting dry sugar!).
3)  Once the sugar starts to boil, you can stop whisking, and wait for it to turn a light amber colour.
4)  When it's light amber, then add your butter, and stir like crazy!
5)  As soon as the butter has completely melted, remove from heat and add the whipping cream.  Again, stir like crazy! (Be cautious when adding the cream as it will foam a lot!)
6)  Let the caramel cool for a bit, and then you can move it to a heat proof container and pop it in the fridge to help hurry up the cooling process.
7)  To make it into a glaze, slowly add a bit of icing sugar until the caramel is a bit thicker.  How much icing sugar you add depends on how thick you want your glaze! 

Now dig in!


These scones make the perfect addition to all of the wonderfully foggy Fall mornings we've been having out here on the West Coast!  Well, let's be real here.  They make the perfect addition to basically any morning, anywhere.

p.s. ♥ kelsey & jordyn


[baked] apple cider donuts

0 comments

I've been seeing a lot of Fall bucket lists going around the interwebs these days, and sometimes they make me chuckle. I live on a pumpkin patch where I pick apples for my job, we make apple cider on a weekly basis, there are hayrides every day of the week, and picking corn is kind of like a boring version of a corn maze.  Sooo....I've definitely crossed off most things on these bucket lists without even trying!  It reminds me not to take things for granted, and every day I feel so blessed to live and work in such a cool place.

However, one of the things on my Fall baking bucket list was to make apple cider donuts!  I had never actually heard of such a thing until I came across a post on tumblr about them.  I was instantly intrigued, and thought they sounded like the epitome of a Fall dessert.  Warm, cozy, fluffy donuts with apple cider and cinnamon?  Perfection!  


My expectations were cautiously high for these donuts, and I wasn't disappointed!  I also quite successfully convinced myself that because they were baked donuts (and not deep-fried), they must be healthy for you.  Am I right?

Apple Cider Baked Donuts
adapted from: eat, live, run
yields: 11-12 donuts

Ingredients:
2 cups all purpose flour
3/4 cup brown sugar
1 1/2 tsp baking powder
1/4 tsp baking soda
1 tsp salt
2 tsp cinnamon
2 eggs
2 tbsp unsalted butter, softened
1/2 cup apple cider
1/4 cup buttermilk  [or 1/4 cup of milk with 1/2 tsp of vinegar....let stand for 5-10 minutes before using]

Topping:
2 tbsp butter, melted

1/4 cup brown sugar
1/4 cup white sugar
1 tbsp cinnamon (or to taste)

Directions:
1)  In a large bowl, mix together the flour, sugar, baking soda, baking powder, salt and cinnamon.
2)  In a smaller bowl, mix together the softened butter with the eggs until fluffy (doing this ensures that your butter doesn't re-solidify once the cold buttermilk and cider are added).  Add buttermilk and apple cider, and mix well.
3)  Pour wet ingredients into the dry, and stir until just blended.  Try not to overmix!
4)  Spread the batter into a greased donut pan.  I used a large spoon to drop the batter in, or placing your batter into a pastry bag to pipe into the pan makes the process nice and easy.  Fill each mold about 3/4 full.
5)  Bake at 350 degrees for 8-10 minutes, or until an inserted toothpick comes out clean. You may want to break open a test donut just to make sure the inside isn't gummy!
6)  For the topping: melt the butter in a bowl that will fit a donut inside it.  Then, dip each donut quickly into the butter, and then into the cinnamon sugar mixture.

*These are best on the first day, as they tend to get a bit soggy once you place them in a container.


Do you have your own version of a Fall bucket list?  I'd love to hear what's on them! 

p.s. ♥ kelsey

pop tarts and apple pie pops

0 comments

Today I thought I'd talk about a few creative ways to use up extra pastry you might have lying around after making pie, tarts, turnovers, piroshki, strudel....you get the idea.  After making my apple pie, I decided to use up the extra pasty by making little pie pops, as well as pop tarts!

Or, if you want to just straight up make pop tarts or pie pops, here's the recipe for the pastry (although beware, it does make quite a bit of pasty!):

Pastry
from: Company's Coming - Desserts
Yield: Pastry yields enough to make 4 pies.
Ingredients:
5 cups Flour
2 tsp Salt
1 tsp Baking Powder
3 tbsp Brown Sugar

1 lb Lard (or vegetable shortening)

1 Egg
2 tbsp Vinegar
Cold water

Directions:
1)  Mix together flour, salt, baking powder and brown sugar in a large bowl.
2)  Cut up lard and add to dry ingredients. 
3)  Using a pastry cutter (or a plain old fork works as well), cut in lard until your mixture is crumbly.
4)  Break your egg into a liquid measuring cup and beat well.
5)  Add vinegar to the measuring cup.
6)  Add very cold water to the measuring cup, until the mixture measures to 1 cup.
7)  Pour liquid mixture over flour mixture slowly, and stir.
8)  Use your hands to work the mixture together until it no longer crumbles apart.  This is where experience will come in, as you don't want to overmix the dough!  Once you make it a couple of times, you'll get the feel of it.
9)  Divide into 4 equal parts.  Each part will make one pie, so you can choose to use it all at once, store some of the dough in the fridge* for up to 2 weeks, or pop some of into the freezer for later!

*If you do refrigerate your dough overnight (or for a few days), be sure to take it out at least an hour before you roll out it.  Otherwise it will be too stiff!

Now, pie pops and pop tarts follow the exact same steps, except for the different shapes....and for pie pops you'll want to insert a cake pop stick inside before adding the top layer.
First, you'll want to roll out your dough, and cut it into equal shapes (circles for pie pops, rectangles for pop tarts).  Then, place a dollop of filling inside (we chose to use raspberry jam or nutella in each one).  Place a matching shape over top, and use a fork to firmly press the edges together.  We chose to use mini cookie cutters to cut out fun shapes in the middle, but that's totally optional!  Finally, to help the pastry brown while it's baking, we brushed a tiny bit of egg white over the top of each pop tart (and also sprinkled some coarse sugar over as well).

Thanks goes to Jordyn for the use of her hands in most of these photos!  She is also a nutella addict...so that addition was hers.  You may or may not be aware of the fact that I'm really not a fan of nutella.

So yes, I'm a huge weirdo who doesn't like pie or nutella.  Don't judge me.


Homemade is definitely better than store bought...although perhaps a little less nostalgic in the case of pop tarts.  But these both make great treats that are perfect finger food for parties!

p.s. ♥ kelsey (and jordyn)